
Step 13: Feature Construction Spotlight - Putting Greens
Key Points
Putting greens are the preeminent areas of a golf course - approximately 40% of the total strokes of an average golfer (and 50% of the total strokes of a scratch golfer) take place on and around the putting greens.
Putting greens are also the most intensively maintained areas of the golf course. This is due to the closely mown turf and abundance of traffic and damage.
A disproportionate (relative to land area) amount of time is therefore devoted to greens design and a disproportionate amount of money is therefore spent on the greens during construction and for ongoing maintenance. As a result, it is wise to consider ways to keep the cost of construction and maintenance down without compromising the quality of the putting surfaces.
Green construction is a multi-step process - from site preparation through drainage, irrigation, and grassing – with impactful decisions for the golf course architect, consulting agronomist, and superintendent every step of the way.
Different methods for green construction include push-up, USGA, and California methods (plus modified versions of these standards). The best profile for a particular site will depend primarily on the local climate, the materials that are locally and readily available, and the construction budget.
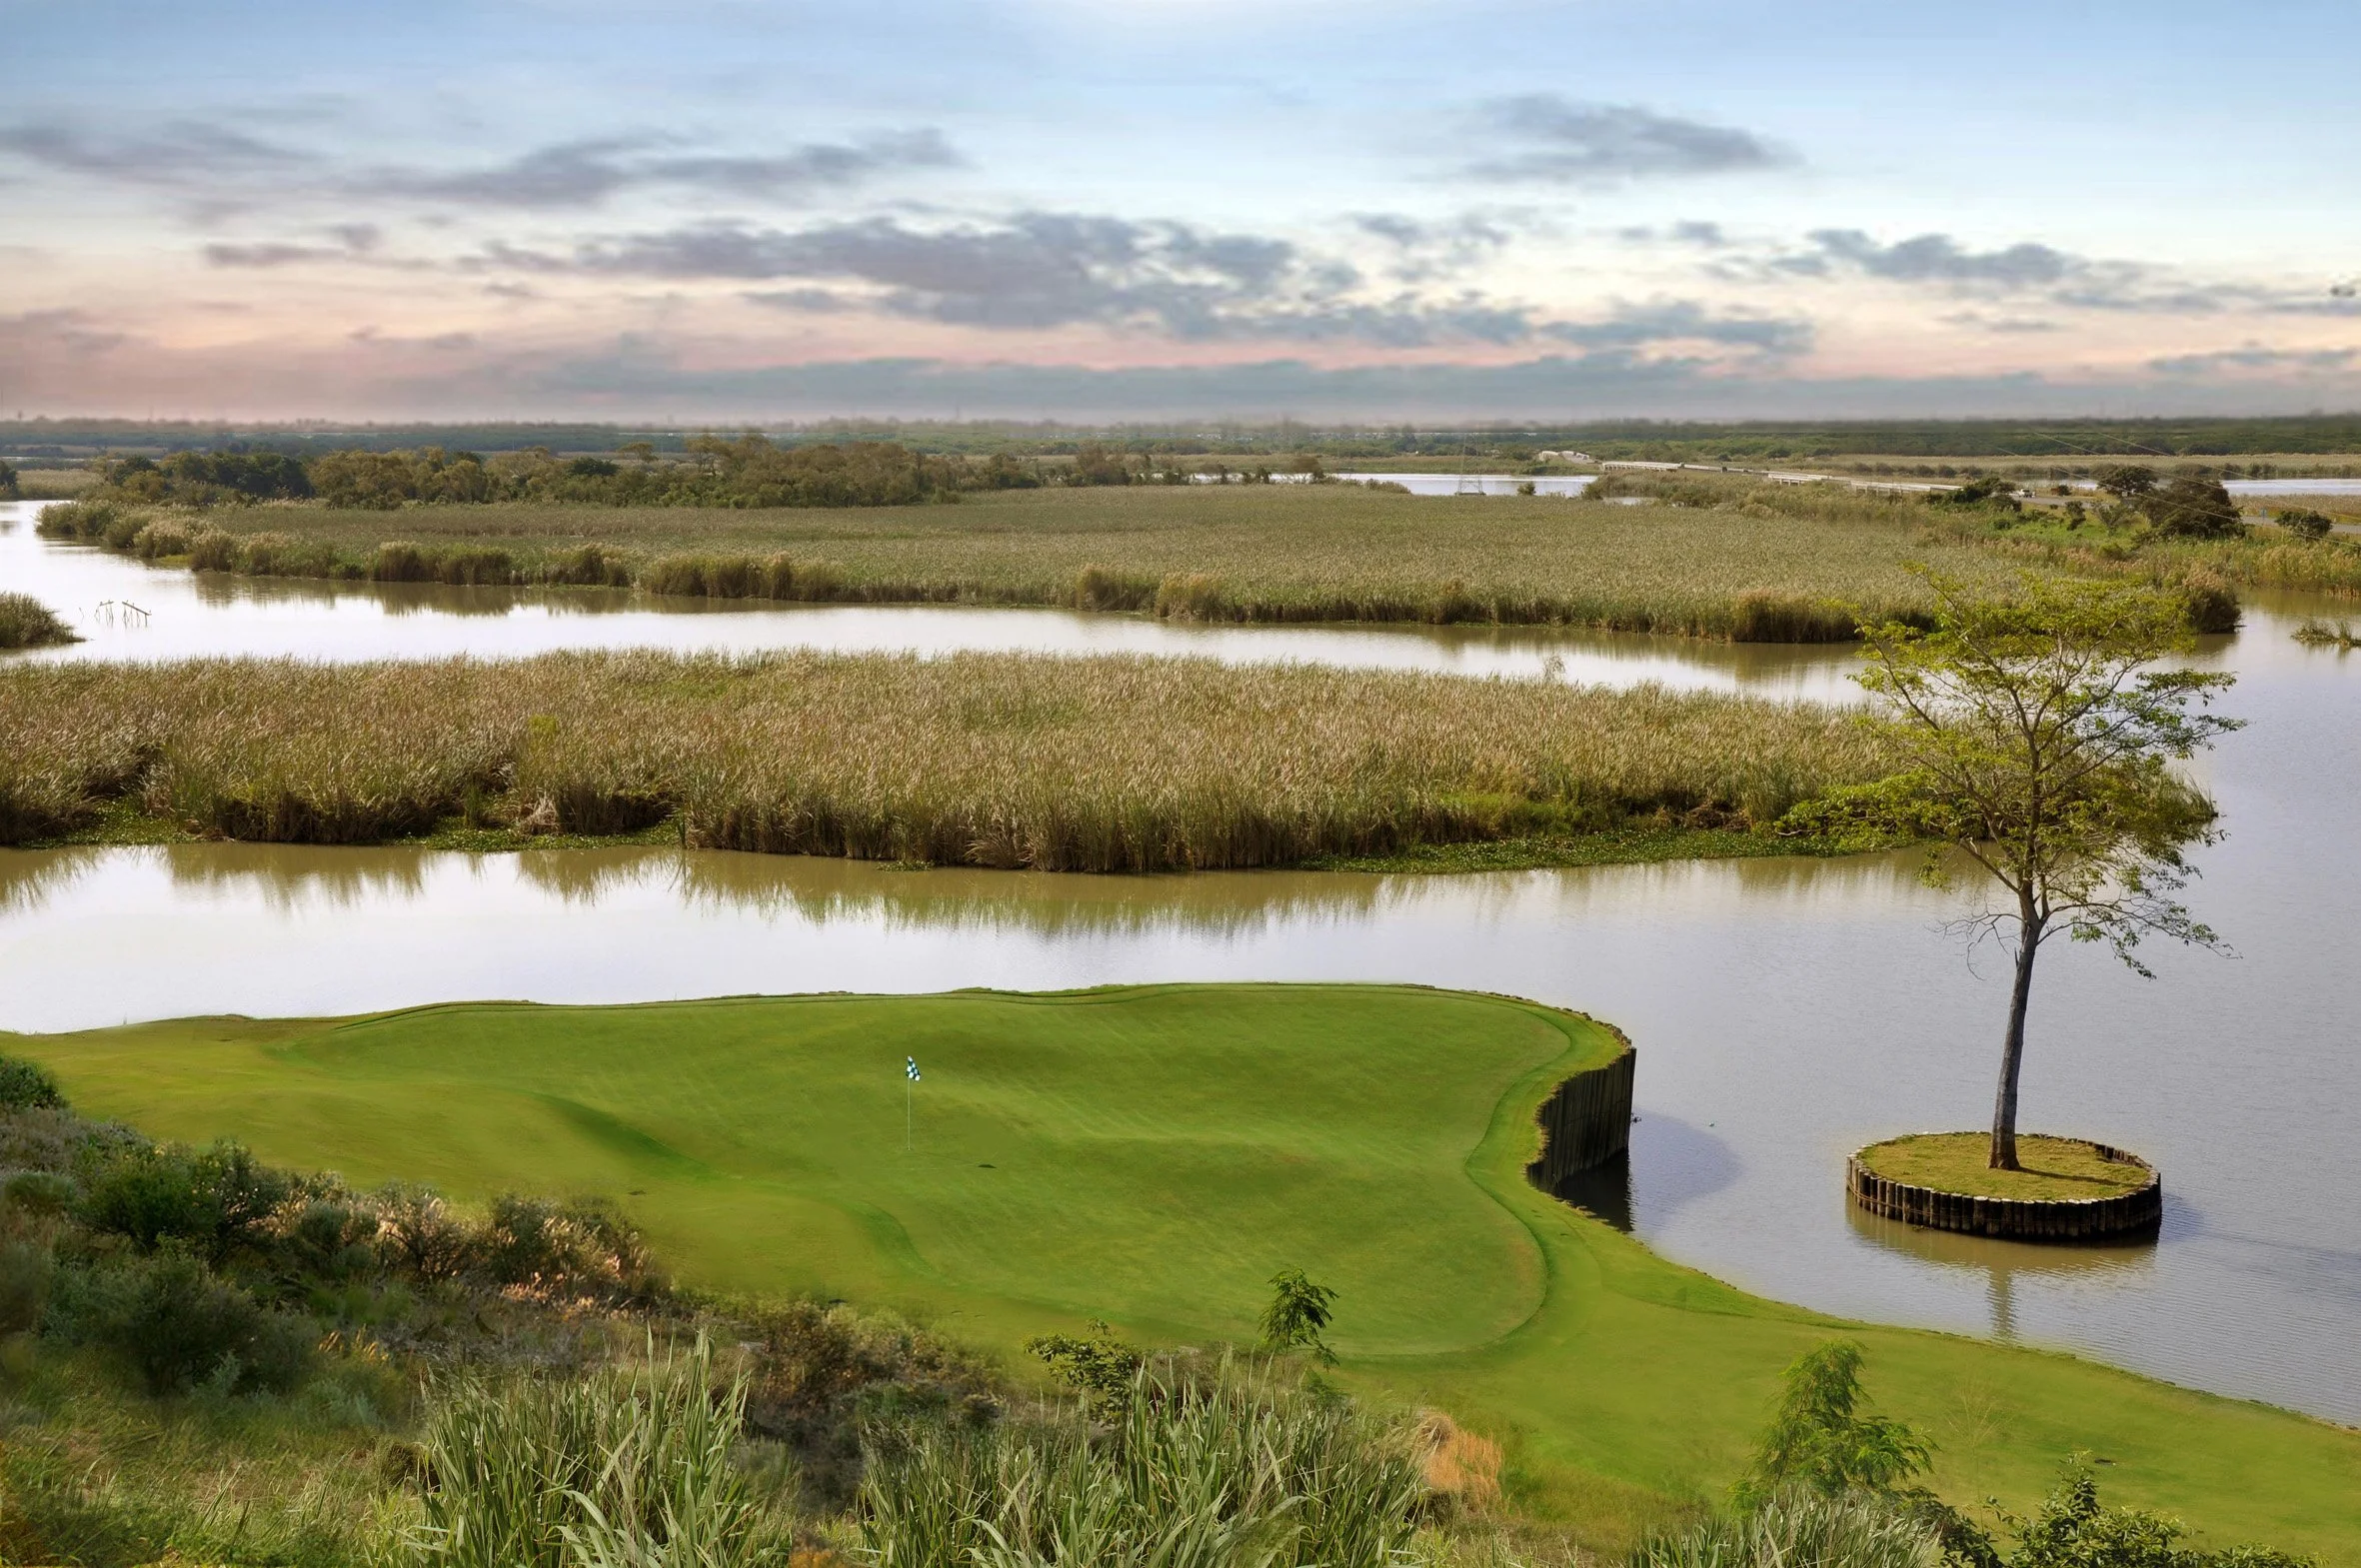
Photo credit - Tampico Country Club by Agustin Piza
The putting greens are, without question, the most important designed and constructed strategic features on a golf course. Up to 40% of an average golfer’s strokes (and 50% of a scratch golfer’s strokes) happen on and around the greens. If done well, the greens can make an otherwise bland site a memorable golf course. It can be argued that varied and interesting greens will make any golf course worth seeing – even overshadowing perceived deficiencies in length, routing, conditioning, etc. As a result, golf course architects often spend a disproportionate amount of time thinking about and designing the greens and their surrounds, especially relative to the amount of space that the greens occupy within the overall development.
Due to the stress of the very low height of cut (often 0.1 to 0.125 inches (2.5 to 3.2 mm)) and the amount of traffic they receive, putting green turfgrass is more intensively managed than any other area of the golf course. They are therefore allotted a similarly disproportionate amount of the construction and the maintenance budgets to ensure they remain healthy, giving consistent and “true” surfaces for putting.
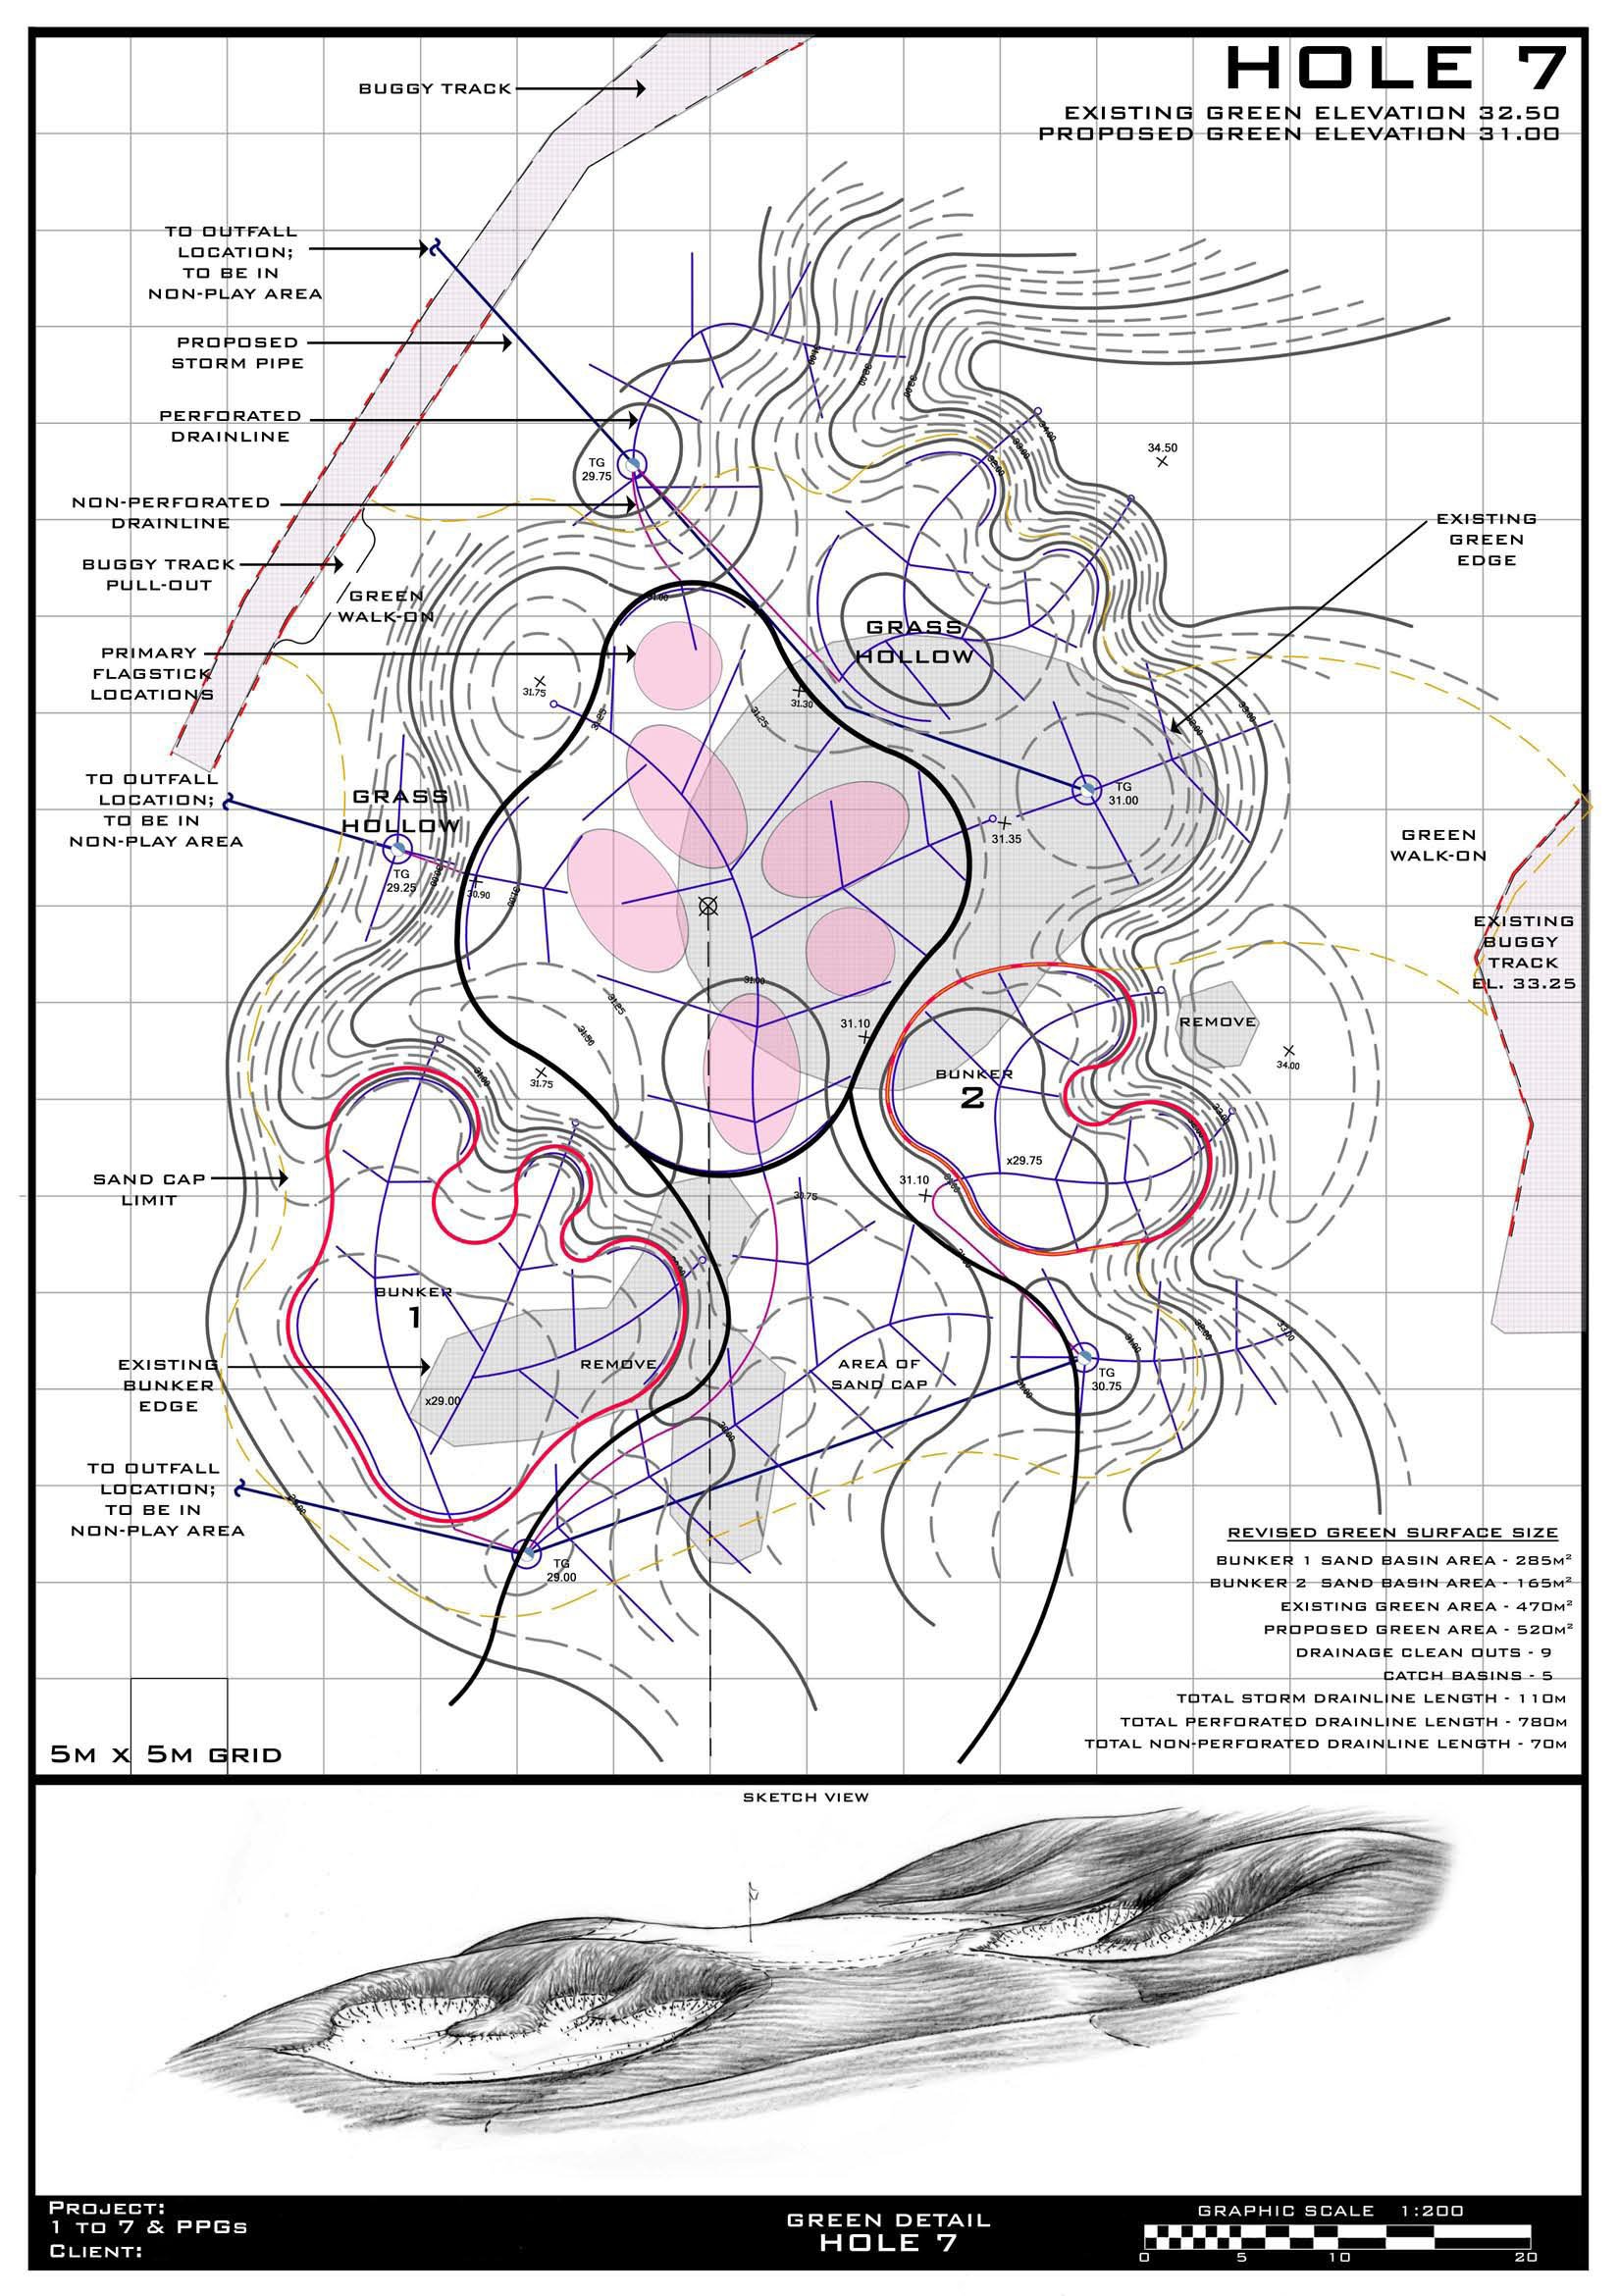
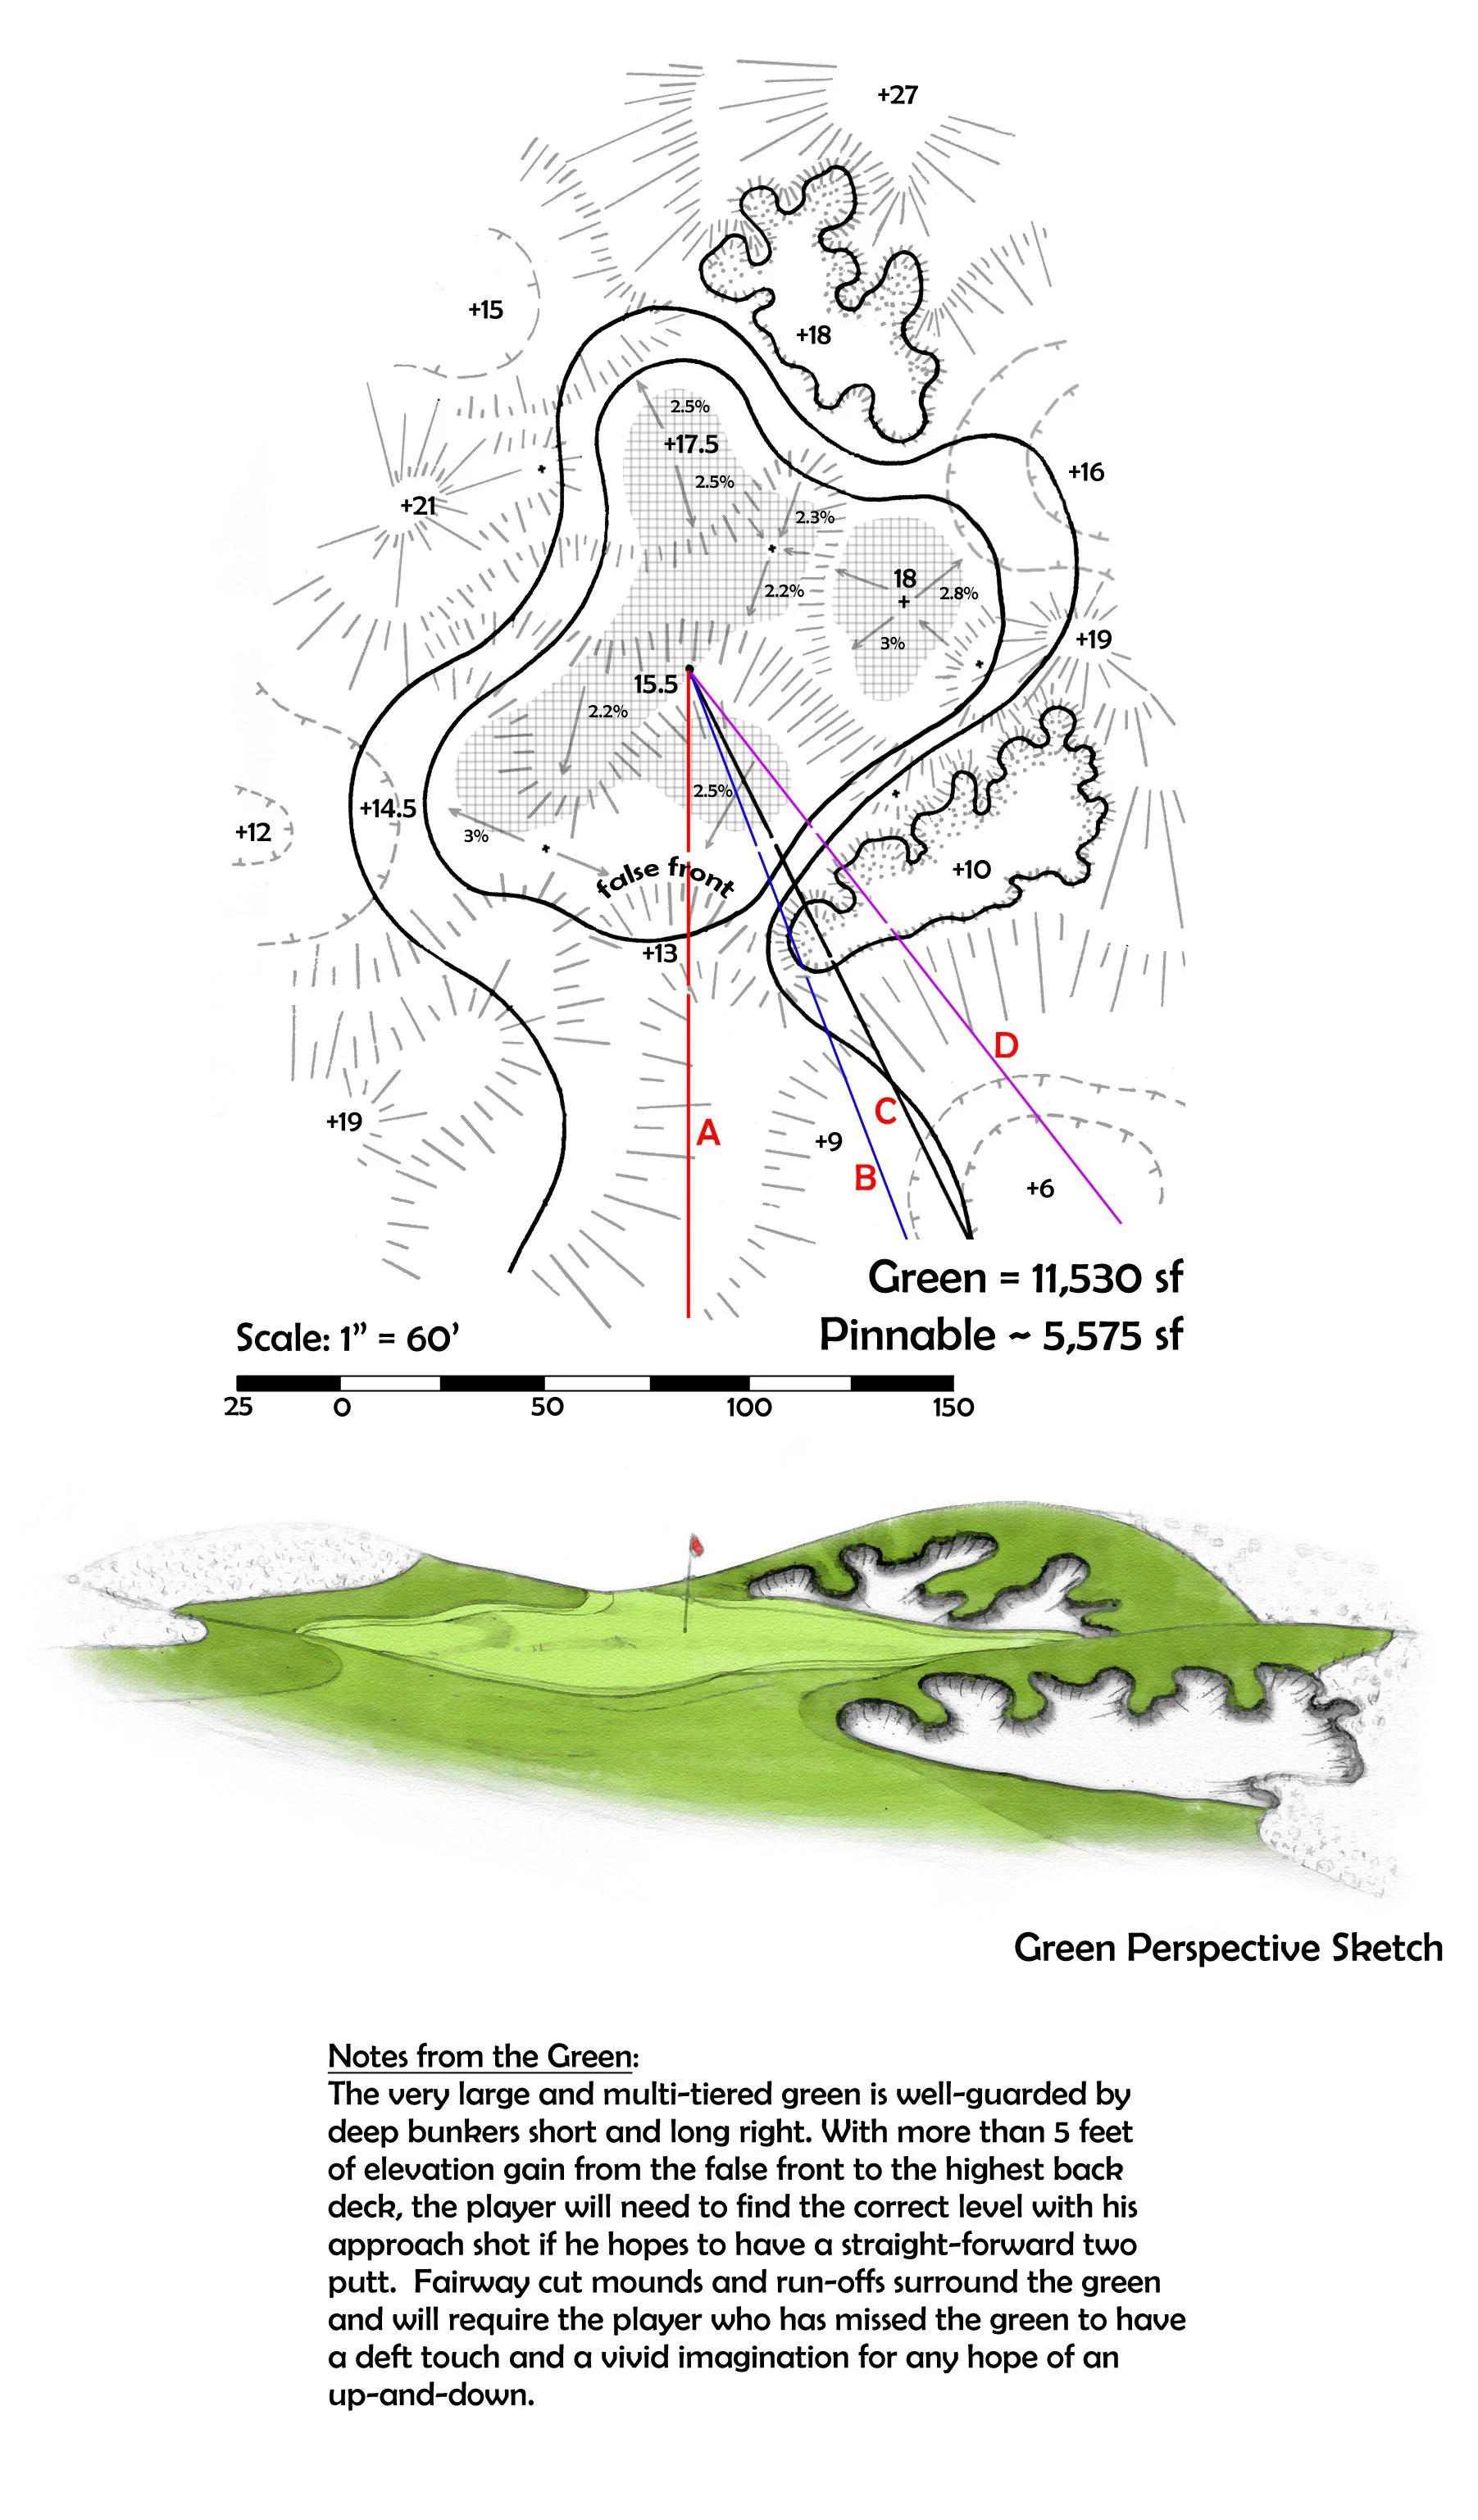
Below are examples of green details dreamed up by golf course architects during the design phase – from more detailed to more conceptual – both showing proposed slopes, “pinnable” areas, and drainage patterns:
GREEN COMPLEX CONSTRUCTION
Site Preparation
Similar to tees and bunkers, the construction of the greens can begin once the clearing and (if necessary) bulk earthwork operations have moved through an area to cut or fill the ground level to within a few feet of the proposed finished grade. Irrigation and storm drainage installation is likely happening concurrently.
Given that the green is the key to the strategy of the golf hole, the golf course architect will typically design the greens at a greater level of detail than the remainder of the golf course, carefully considering the “pinnable” areas (defined below), surface drainage patterns onto and off of the green, and how the golfer and the maintenance staff and maintenance equipment will access the green so that traffic and compaction can be distributed over a wide area.
For projects that are bid and built by a golf course contractor, a grade checker can use the golf course architect’s detailed plans to “stake” the extents of the green at a regular interval, often with an elevation change (from current ground level to the proposed subgrade level) marked on each wooden stake. Bunkers, low points, and mounds within the green’s surrounds (the “green complex”) will typically also be staked with elevation changes so that they may be seamlessly tied into the shape and slopes of the green surface. Alternatively, very detailed CAD files can be imported into GPS-guided construction equipment to efficiently achieve the desired design levels to a high degree of accuracy. Once these grades are achieved, the shaper can then make final adjustments and tie-ins.
For design-build jobs, since it is the golf course architect or a trusted associate doing the shaping, the plans can be more conceptual (and the green designed a bit more “on the ground”), but the golf course architect/shaper will still be working within the same basic constraints – the size of the green, the proportion of the green that is pinnable, how the green will be accessed by people and machinery, and where surface water is going to flow onto and off of the green - will all have to be carefully considered to create functional greens within the desired budget.
Approval in Subgrade
If the golf course architect is not doing the shaping personally, it is important that they be regularly present and available to discuss the concept for the green complex with the shaper. Regardless of how detailed and well-conceived the green designs may be, opportunities to improve how a green complex blends with, and fits into, its natural or manufactured surroundings will present themselves during construction. These will be lost opportunities if the golf course architect is not available to suggest and approve changes and/or flexible enough to adjust the initial design.
Furthermore, modern turfgrass varietals and maintenance practices have allowed for much faster green speeds, so very subtle variations in slopes on and around the greens can have a big impact on the amount of the pinnable area that will be available to the superintendent. What constitutes a pinnable area varies based on average green speed as measured by a Stimpmeter (the turfgrass type, firmness of the green, and cut of height are all contributing factors to the Stimpmeter reading). Below is a chart showing recommendations for the maximum pinnable slope based on the measured speed of the green.
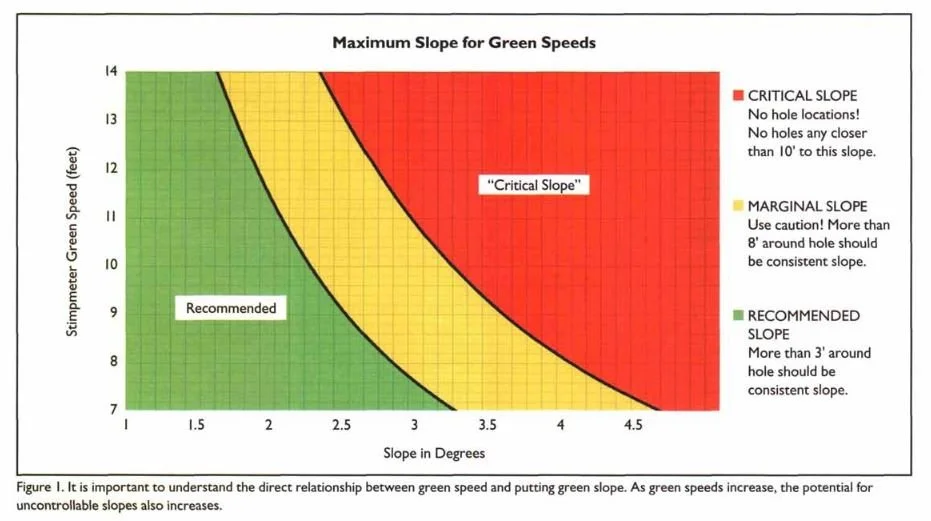
(Lemons, Jerry, Putting Green Speeds, Slopes, and “Non-Conforming” Hole Locations. USGA Green Section Record, July-August 2008, pg. 22)
It is important to have adequate pinnable area because the area near a cup position is subject to much more traffic, compaction, and (spike, pitch) damage than the rest of the green. If there aren’t enough cup locations to rotate through and allow each area to fully recover, it will become increasingly difficult to maintain healthy turf in those areas of the green.
“A green typically needs no fewer than 14 days for old hole locations to recover from play. If these 14 areas have a radius of 8’ (200 sq. ft.), then 2,800 sq. ft. of space usable for hole locations on the green is needed. The putting surface from the collar inward to 10’ [an area that is not typically used for hole locations] contains about 2,200 sq. ft. This means that a 5,000 sq. ft. green needs all 2,800 sq. ft. of remaining usable space to handle normal golfer traffic. Smaller greens can accommodate play only if additional maintenance practices, such as aerification, are intensified. When steep slopes exist on these greens and are maintained at too fast a putting speed, the functionality of the green diminishes. ”
Finally, it is incumbent upon the golf course architect to ensure that excess runoff from precipitation and irrigation is captured or diverted away before it reaches the green and, when it does reach the green, that the water quickly moves off the green surface. This is best done by ensuring adequate slopes over the entire green (at least 1%) and having the water move off the green at multiple points so there are shorter runs of overland flow.
The golf course architect is ultimately responsible for ensuring that the green complexes are reinforcing the intended strategy of the golf holes, have sufficient pinnable area for healthy turf, are accessible to golfers and maintenance staff and maintenance machinery from multiple locations, and repel and drain surface water quickly to multiple locations.
Push-Up, USGA, and California Green Construction
The most popular methods of green construction are:
Push-up greens that are built on free draining native soils and built-up with sand topdressing,
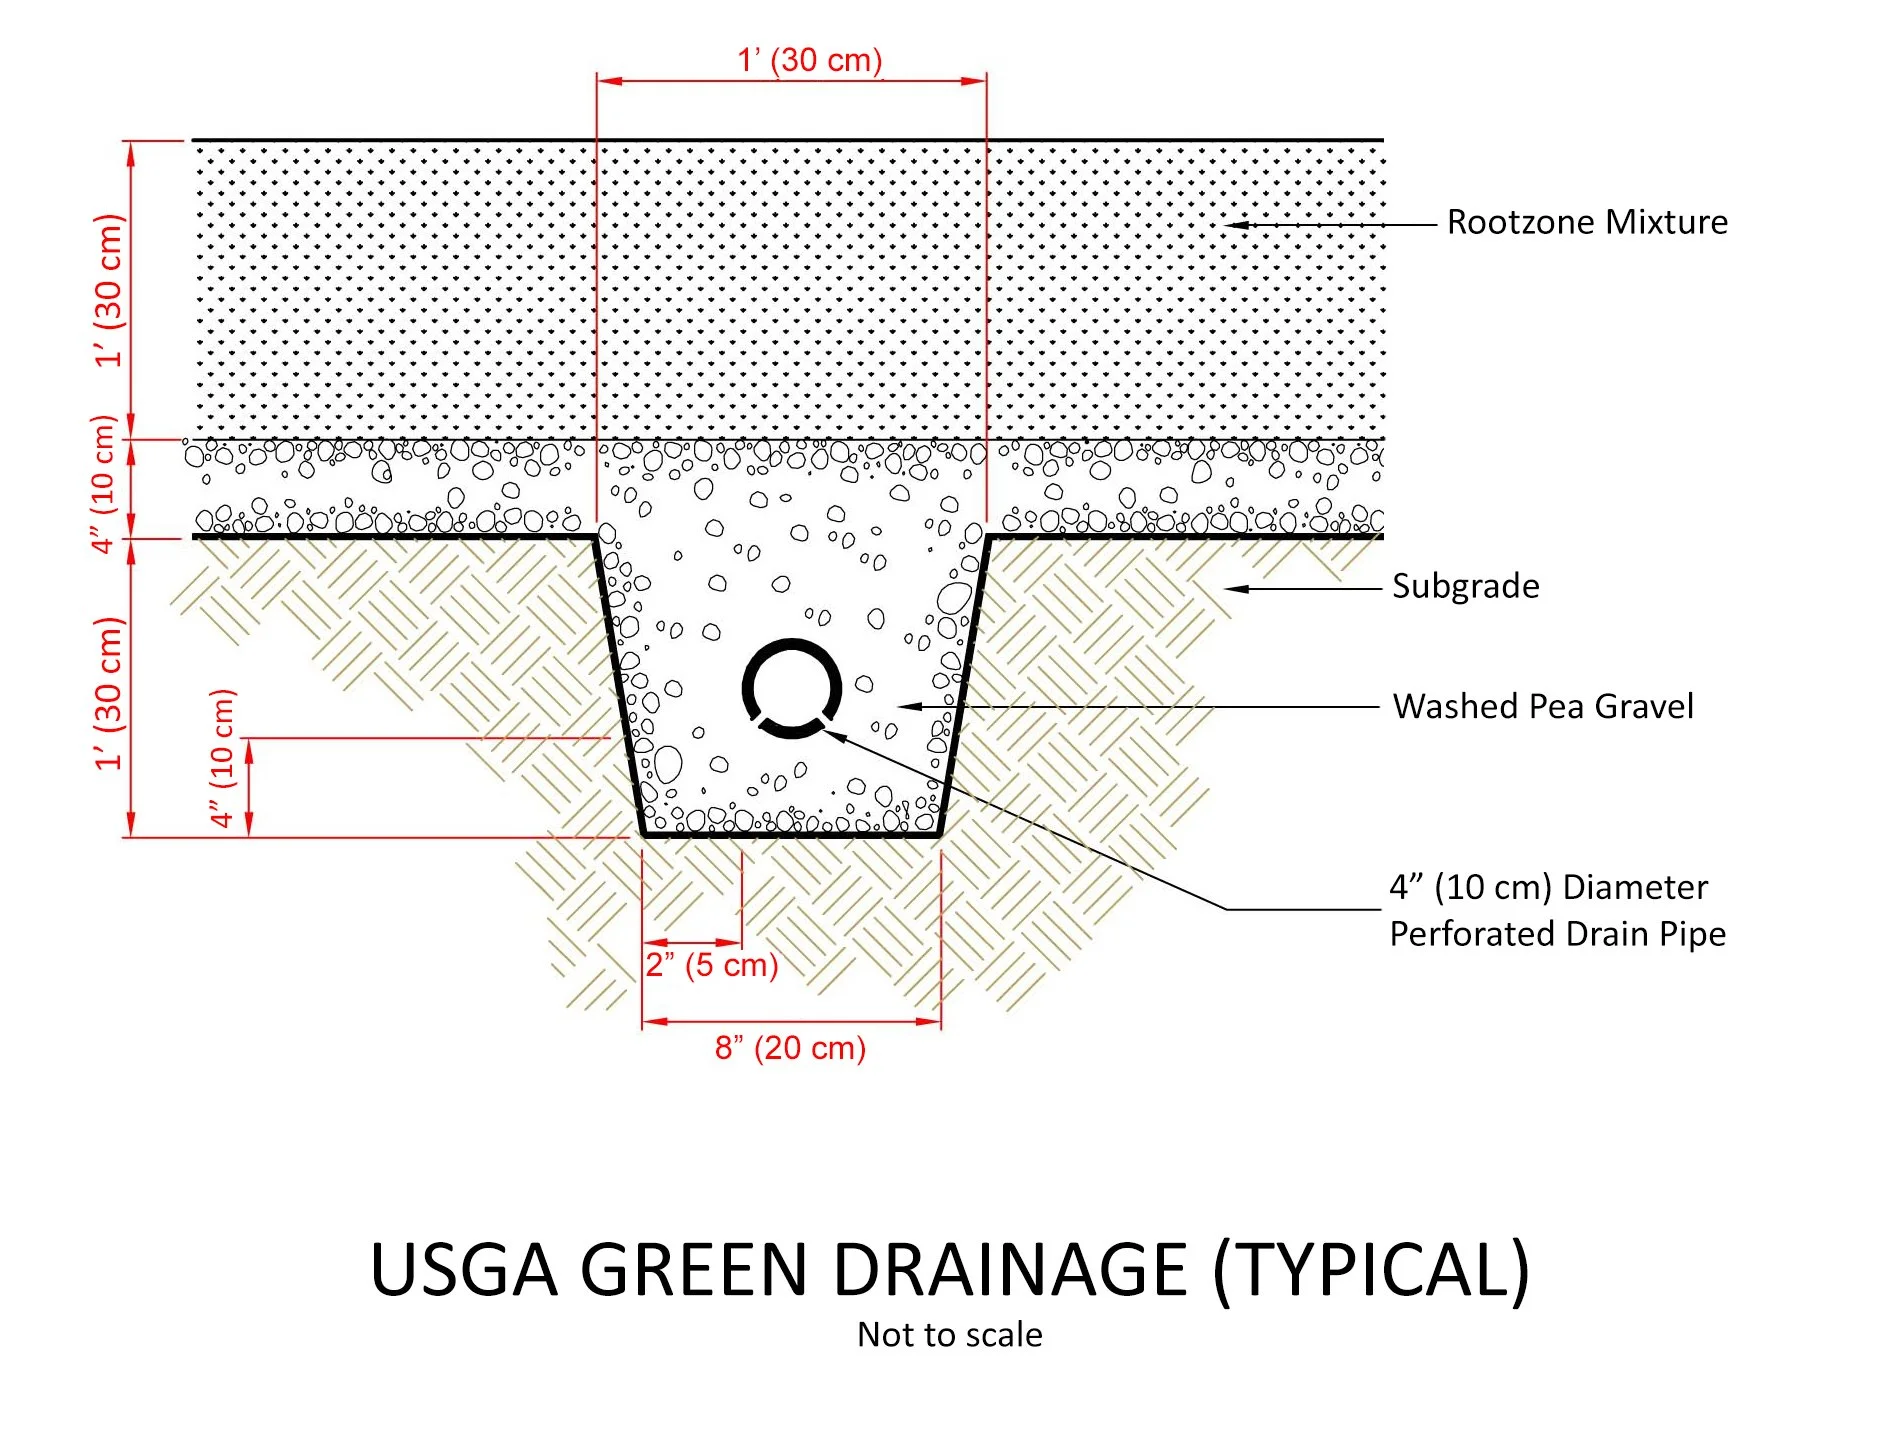
USGA greens that typically consist of a 12” (30 cm) thick rootzone (sand mixed with organic material) over a 4” (10 cm) thick gravel layer,
California greens that consist of a 12” (30 cm) thick rootzone without a gravel layer, and
Modified USGA and California greens that deviate from the standard guidelines.
Push-up greens construction is primarily a method of the past that is no longer favored except in very specific cases, such as where the native soils are pure sand or of such quality that no imported sand or soil mixes are required.
The USGA profile was conceived to maintain a perched water table in the gravel layer while the California green’s sand profile drains more thoroughly. Both USGA and California greens will typically have either perforated pipe in gravel trenches that are cut into the subgrade or flat perforated pipe that is stapled to the subgrade beneath these layers.
There are other variations of green construction that are based on these architypes (modified USGA and California style), where the thickness or composition of each layer and the subsurface drainage may differ slightly. The golf course architect and consulting agronomist will need to determine the best method of construction and any modifications that should be made to the standard methods based upon the climactic conditions of the site (shade, air movement, humidity, etc.) and the physical properties of the available materials (sand, gravel, and irrigation water).
A detail showing a common section for a USGA green is below:
Ringing or Coring
A push-up green will typically be shaped in place from the available local material without subsurface drainage pipe. USGA and California-style greens, in contrast, will have subsurface drainage and must be built in layers with imported materials that have been selected by the golf course architect and the consulting agronomist.
After the approval by the golf course architect of the green complex slopes and shapes at the subgrade level, there are two typical methodologies for constructing the green – ringing and coring – and the option that is chosen will depend upon the amount of fill that is locally available. With ringing, the subgrade that has been approved is kept as the floor of the green and the surrounds are built up with topsoil by a depth equal to the depth of the chosen green section (i.e. 16” (40 cm) (12” rootzone + 4” gravel layer) for a standard USGA green). In contrast, with coring, the contractor will have to remove that depth of material from within the perimeter of the putting green, leaving an empty shell surrounded by the higher surrounds.
For a green to be ringed, the shaper will need to have enough fill to tie-in the green surrounds to the raised perimeter of the green. For cored greens, the material dug out of the core will need to be shaped and blended into the green complex or taken elsewhere. In both cases, the shaper will typically have to match the contours of the subgrade to the desired finished level grading of the putting surface as closely as possible so the depth between the finished surface and the subgrade is uniform and consistent (although there is also research suggesting that a variable depth rootzone is more effective at reducing moisture extremes for undulating greens (see B. Leinauer, Ph.D., P. Rieke, Ph.D., and J. Crum, Ph.D, Retaining Moisture in USGA Putting Greens. Golf Course Management Magazine, July 2001, pg 65-69) .
For USGA and California-style greens, an impermeable membrane interface liner is sometimes installed around the perimeter of the green from finished elevation down to the undisturbed subgrade. This is necessary when the moisture needs of the turfgrass on the green is significantly different than that of the turfgrass on the green surrounds because the interface liner will prevent the native soils that are surrounding the green from pulling moisture out of the green rootzone. This impermeable barrier can also be useful for permanently defining the edge of the green (using a trace wire), giving the maintenance staff an easily located guide for mowing and spraying.
Subsurface Green Drainage
Upon approval of the final subgrade shaping by the golf course architect, the drainage crew will typically dig trenches (as laid out or approved by the golf course architect) into the subgrade for the installation of round perforated drainage pipe. The trenches should be smooth and compacted and pitched enough (minimum of 0.5%) to ensure that water drains in the perforated pipes toward a solid exit drain pipe. A gravel bed of a uniform thickness is prepared, the round perforated pipe is installed with the perforation at the bottom of the pipe, and the trenches are backfilled with the same gravel. It is good practice to mound the pipe trench gravel an inch or two (2.5 – 5 cm) above the level of the subgrade to prevent silt from washing into the pipe trenches. Similar to bunker drainage, a clean-out should be installed at the high end of the perforated pipe main lines to prevent a vacuum from forming and allow for flushing the drainage pipe should it start to get clogged.
As an alternative, flat perforated drainage pipe can be used, eliminating the need to dig trenches and also eliminating the material and transport cost of gravel for those trenches. Flat pipe has been shown to perform as well as round pipe so a cost analysis and material availability should ultimately determine which is used. From the 2018 revision of the USGA Recommendations for a Method of Putting Green Construction:
“…as an alternative to round pipe placed in a trench, flat pipe placed directly on the prepared subgrade may be employed, provided the flat pipe conforms to ASTM D7001, is a minimum of 12 inches (300 mm) in width, and is not covered by a geotextile sleeve. The flat pipe shall be stapled to the subgrade, or otherwise held in place to prevent shifting during construction.” (USGA Recommendations for a Method of Putting Green Construction, 2018 Revision, pg. 4)
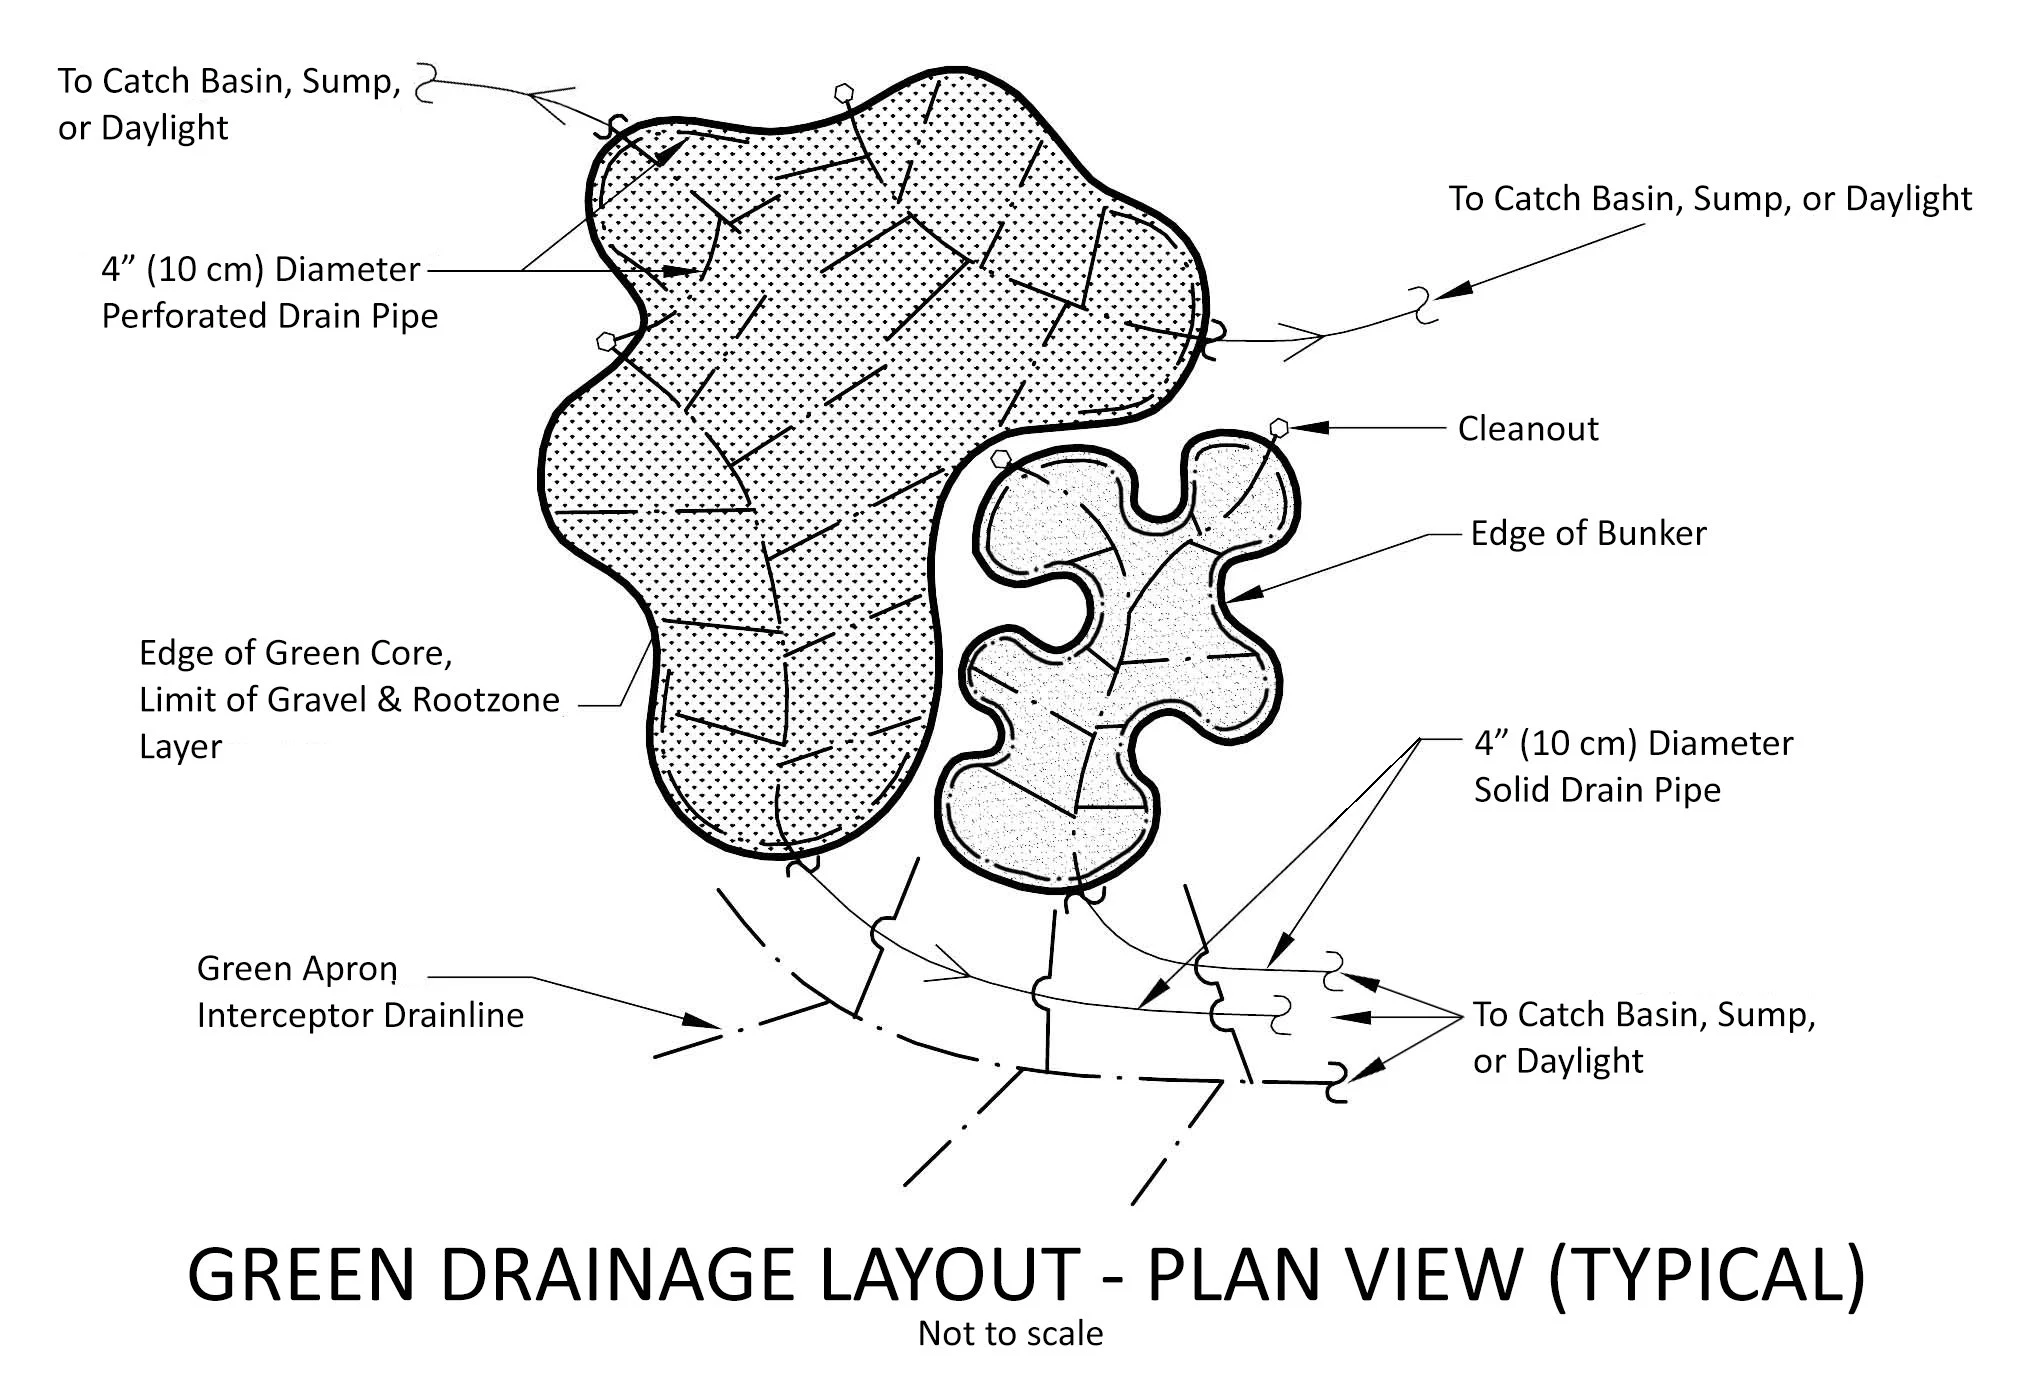
Below is a detail showing a typical drainage layout for a green complex:
Installing Drainage and Irrigation Around the Green Complex
As was discussed in Step 10: The Design and Installation of the Irrigation System, irrigation and subsurface drainage are often installed at around the same time but, since the drainage pipe is cheaper and easier to repair or replace, it typically gets installed first. Around the green complex there will often be multiple solid exit drainage pipes installed plus at least one solid exit drainage pipe per bunker. The perforated pipe that drains the interior of the green and bunker(s) will drain into these solid pipes, which will convey the water into either a nearby sump, the larger subsurface drainage network, or a nearby SuDS feature. As was discussed in Step 8: Storm Drainage Design and Installation & An Overview of SuDS, the solid drainage pipe should not drain directly into a water feature without adequate filtration.
Once these solid exit pipes have been installed, the irrigation design consultant can work with the golf course architect to efficiently lay out irrigation heads around the green complex, with the goal of ensuring proper irrigation coverage and uniformity to not just the green but also the fairway approach, grass bunker faces, and mounds. A quick-coupler is also typically added nearby so that the maintenance staff can water the green and surrounds by hand as needed.
The Composition of the Rootzone
The rootzone will be the growing medium for the most intensely maintained turf on the golf course. It is therefore vital to get its physical characteristics correct and to maintain a level of uniformity from green to green for ease of maintenance.
The selection of the rootzone mix and a guarantee of its uniformity will be one of the most important jobs for the consulting agronomist. They must first determine what material is available on or near the site and have the physical properties of the material tested for its suitability as a growing medium. The consulting agronomist must also determine whether the source for the rootzone material (whether on-site or imported from elsewhere) is available in sufficient quantity to construct all of the greens, with additional rootzone material remaining for topdressing and a turf nursery. If more material is needed than is naturally available, additional rootzone material can be manufactured by mixing physically similar sand and organic material to the correct proportions. The consulting agronomist will be responsible for making sure that the manufactured material is consistent and compatible with the original material by sending samples to a soil laboratory.
One final consideration is to determine whether the bunker sand (particularly the sand that is placed in the green-side bunkers) is compatible with the green rootzone mix. Sand splash from golfers hitting shots out of the green-side bunkers will inevitably end up on the greens and the physical properties of that sand (particle size and shape, primarily) must be selected for its compatibility to the sand being used for the construction and top-dressing of the greens.
Finishing the Green Complex
After the drainage and irrigation systems have been installed and the trenches for each have been properly compacted and cleaned up by the drainage and irrigation crews, the shaper can return to the green complex with a crew of laborers to bring the green up to finished grade with the rootzone mix (and gravel, if a USGA green) and clean up the entire area for planting grass. The rootzone material will be carefully blended with the surrounds using small machinery (e.g. small bulldozers and Sand Pros) and hand labor, with special care taken to prevent intermixing with topsoil.
The next step is to establish grass around the edge of the green, which will help to prevent silt from washing onto the green and contaminating the rootzone. As discussed in Step 12 – Feature Construction Spotlight: Bunkers, sod is typically used instead of seed around the edge of the new green because it establishes significantly faster, despite its higher cost. The green and surrounds can then be seeded during the grow-in phase.
Sustainability and Accessibility in the Design and Construction of Green Complexes
Greens can be very expensive to build and maintain so there are some important decisions to be made in the design phase that will impact the construction budget as well as the long-term financial sustainability of the golf course.
The first and most important decision is how much area to devote to putting surfaces. For a green to be strategically interesting, there needs to be enough area to have adequate and diverse pinnable locations. Greens that are too small will either be difficult to maintain to a high standard due to excessive compaction and damage happening around the limited hole locations, OR they will require more frequent and intense maintenance practices to maintain healthy turf, OR they will be mostly flat and not very interesting. Greens that are needlessly large are more expensive to build (requiring additional materials such as rootzone, gravel, and pipe) and maintain (requiring additional mowing and inputs). A happy medium must be found that doesn’t compromise the desired strategy of the golf hole.
When possible, construction expenses should be minimized by using on-site or local materials. Can the greens be push-up (built only from the native soil)? If not, can acceptable sand and gravel be found locally and in enough abundance? If the local materials aren’t ideal, can they be modified to achieve the desired physical characteristics? The water that will be used for irrigation should also be tested for its chemical characteristics and to determine if it also needs modification to work well with the rootzone being used.
The method of green construction will also have a big impact on material costs. Push-up greens using native soil are the most economical so, if the site is blessed with native sand that will drain and grow healthy turf, they should be strongly considered. California-style greens eliminate the 4” (10 cm) thick gravel layer used in USGA greens. Since there is no gravel layer, they are also easier to build so, if the consulting agronomist can achieve the desired physical characteristics, these should be favored over USGA profile greens. Finally, as discussed earlier, flat perforated drainage pipe laid on top of the green’s subgrade has been shown to perform just as well as the more standard round perforated drainage pipe in gravel trenches – but without the time and cost of trenching and gravel.
The selection of turf is another major decision. There are many new cultivars of both cool- and warm-season grasses that are able to tolerate the low cutting-height of a putting surface. The consulting agronomist and superintendent should work together to find the cultivar that best fits the site’s climactic conditions and desired playing characteristics. This will be discussed in greater detail in Step 16 – Grass Selection.
In terms of accessibility, some other things that should kept in mind during design and construction:
Where are the golfer and maintenance points of access to the green and how many points of access are there? How close can golfers with physical limitations get to the green with a golf cart? How and where will maintenance staff and equipment access the green? As discussed earlier, greens should have multiple points of access from both the cart path and the fairway. Otherwise, excessive wear and compaction will impact the health of the turf over the long term.
Contact Sustain Golf for more information!
We firmly believe that common sense sustainable design, construction, and maintenance practices are the keys to the long-term outlook for the game of golf. We at Sustain Golf aspire to be on the leading edge of applying sustainability concepts to golf course design and construction.
We would be happy to answer any questions that you might have about sustainable golf course design, maintenance, and construction. Visit us at www.sustaingolf.com or contact us at the following email address for more information: matt@sustaingolf.com.
Up Next:
Step 14 – Feature Construction Spotlight: Man-Made Water Features and Cart Paths
References:
Hurdzen, Dr. Michael J. Golf Course Architecture: Design, Construction & Restoration. Chelsea, MI: Sleeping Bear Press, 1996.
Richardson, Forrest L. & Fine, Mark K. Bunkers, Pits & Other Hazards. Hoboken, NJ: John Wiley & Sons, Inc., 2006
Lemons, Jerry, Putting Green Speeds, Slopes, and “Non-Conforming” Hole Locations. USGA Green Section Record, July-August 2008, pg. 22
B. Leinauer, Ph.D., P. Rieke, Ph.D., and J. Crum, Ph.D, Retaining Moisture in USGA Putting Greens. Golf Course Management Magazine, July 2001, pg 65-69
USGA Recommendations for a Method of Putting Green Construction, 2018 Revision
Photo Credit:
Club Campestre Tampico, Pizá Golf
Rockwind Community Links, Staples Golf Design
Green Detail Credits: Ronald Fream Golf Consulting, Greengrass Golf Design
Peer Review:
Dr. Keith Duff, former UK government wildlife agency Chief Scientist, current Golf Environment Consultant
Forrest Richardson, ASGCA - President, Forrest Richardson & Associates